2024年5月14日 6:21:40

Home Assistant installation Guide

2 年 前
#18 引用
Beginner’s Guide to Home Assistant Install

Open source home automation that puts local control and privacy first.  Perfect to run on a Raspberry Pi or a local server.

There is too much information for a beginner.

https://www.home-assistant.io/

Home Assistant 是一个成熟完整的基于 Python 的智能家居系统。官方支持debian操作系统。

Home Assistant Core是核心功能,相当于基础版,完全开放。
Home Assistant Container是安装在docker下的homeassistant core容器版,半开放。
Home Assistant OS是带插件库的homeassistant core容器版,相当于完全版,封装好不开放。

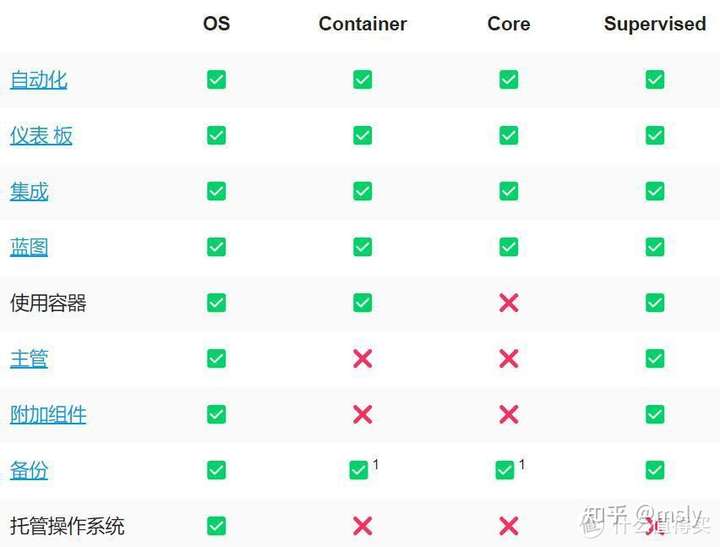
Home Assistant支持全平台安装,大致可分为以下四种方法

系统模式(Home Assistant Operating System):将固化了HA的系统直接安装到主机上,一般安装树莓派等低功耗物理机或VM虚拟机中;
容器模式(Home Assistant Container):将核心运行在Docker容器环境中,可以实例运行在任意设备上,不需要单独分配一台主机或虚拟机;
监管模式(Home Assistant Supervised):功能最全面的直接安装,需要进行繁杂的设置;最大的用途有两项,一是升级管理,二是add-on;supervisor会不停的提醒你各种更新;HA一个月差不多会发5-6个版,这里还没有算上各种add-on的更新
核心模式(Home Assistant Core):将核心添加到指定的主机中,需要自行安装对应的依赖后配置Python虚拟化环境。


Host Operating System

知名的 Linux 发行版,包括当下流行的 Ubuntu、Deepin、elementary OS、「树莓派」的官方系统 Raspberry Pi OS (Raspbian) 等,其实都是基于 debian 衍生而来的!


HA Operating System,又称 HassOS,提供了一个包含了HA 的操作系统镜像。内部基于 Docker 容器引擎,通过容器化部署的 Supervisor 容器化控制 HA Core 及相关应用。
既然是 OS,因此只能在独立物理设备或者是虚拟机中进行安装。官方推荐

HA Container,基于容器技术独立安装 HA Core,如 Docker。免去了各种环境的不统一困扰。需要在支持容器化技术的操作系统中安装和使用。

Home Assistant Supervisor,前身 Hass.io,是一个基于容器化的系统,通过容器化部署的 Supervisor 容器化控制 HA Core 及相关应用。HA 提供了 手动安装 脚本。


和 HA Operating System 最大的区别就是可以安装在已有的操作系统上,其它都一样。
HA Core,手动安装在 Python 虚拟环境中,纯手动,可能需要一定的折腾能力

https://github.com/home-assistant/supervisor
https://github.com/home-assistant/supervised-installer

说起Home Assistant,其实有两个分类:

安装 Home Assistant 一般有两种方式:

在虚拟机中安装 Hassio - HA 提供的内置相关功能的磁盘映像(可以参考:https://bbs.hassbian.com/thread-8119-1-1.html),这种方法的优点在于非常简单,很快就可以开启一个 HA 的服务器,然后就可以在浏览器访问了,而且 HA 也提供了大量供用户自定义的选项。

下载 HA Core 源码,自己组装相关组件(如:Frontend),这种的方式则是为了实现更完全的自定义,如:修改左侧导航栏的标题。


Home Assistant installation

https://www.home-assistant.io/installation/windows


https://bbs.hassbian.com/thread-11553-1-1.html

1.General Knowledge of Home Assistant installation-https://www.msly.cn/general-knowledge-of-home-assistant-installation


1. Raspbian+Docker+Hassio的形式
https://bbs.hassbian.com/thread-2585-1-1.html


Why does Home Assistant have so many names?


https://analytics.home-assistant.io/
Sun 235,989 (99.4%)


https://rpi-imager-stats.raspberrypi.com/

HAOS
系统资源占用的问题。如果像是树莓派一类的直接跑HAOS,当然是没有问题,并且也是官方非常推荐的方式,专机专用麻烦事肯定会少。

但实际上大家更多的是在使用虚拟机在跑,而虚拟机的资源占用就远高于Docker,我的经验是,2G内存就可以很稳的跑Container,如果放在NAS里,则4G内存也足够。

但是要用虚拟机的话,最好要有8G内存,给虚拟机分配上4G。

Home Assistant is a full UI managed home automation ecosystem that runs Home Assistant Core, the Home Assistant Supervisor and add-ons. It comes pre-installed on Home Assistant OS, but can be installed on any Linux system. It leverages Docker, which is managed by the Home Assistant Supervisor plus the added benefit of dozens of add-ons (think app store) that work natively inside the Home Assistant environment.

If you do not understand what this means, or that making almost any changes to the underlying OS may render your install Unsupported/Unhealthy, this installation method is not for you and you should install HA OS. If you do not require the supervisor, then installing HA Container 715 may be a better option and will allow you full control over the OS to install additional software and Docker containers.
0
2 年 前
#31 引用
There are to install Home Assistant.

https://www.home-assistant.io/installation#compare-installation-methods] four official ways


You chose the one that comes with its own operating system. It’s a highly streamlined version of Debian Linux, optimized for hosting the docker version of Home Assistant Core (and several other, related docker containers). This purpose-built operating system does its own updates as well. The main goal is to provide just enough operating system to host Home Assistant and no more.

If you want complete control over the operating system, including the ability to install other things, you will need to choose one of the other three installation methods.

Home Assistant Core

Your startup is long/slow because there’s no wheels for your platform, and in another year you’ll have to build Python 3.11 from source and re-create the venv.

Home Assistant Docker

I’d recommend using Docker

Home Assistant Supervisor

Host Operating System  Ubuntu 20.04.2 LTS
Supervisor Version  supervisor-2021.06.6
Docker Version  20.10.6


1. Home Assistant Operating System[/b]
https://github.com/home-assistant/operating-system

称 HassOS,提供了一个支持多平台的最小化的 HA 操作系统,底层基于 Docker 容器引擎,通过容器化部署的 Supervisor 容器化控制 HA Core 及相关应用。由于是 OS,因此需要独立设备或者虚拟机进行安装。

带操作系统的Home Assistant,也就是HassOS, Hassbian, Hass.io都是这一类。其实他们都是Home Assistant在发展过程中的不同名字,事实上都是同一个东西,但是名字的变化给小白带来很多困扰。为了方便,以下统称HassOS

1.1 在1台物理设备上安装 HA Operating System

走HassOS道路的好处是功能完整,设置容易,按照官方的说明一步一步执行下来,肯定可以成功搭起来,日后升级也容易。缺点是要专门占用一个设备,官方支持的设备有限,只有Raspberry Pi 和 x86小主机2种。x86小主机如果被HassOS独占,很明显是资源的浪费(土豪请随意)。另外如果碰到网络方面的问题(特指在Add-on Store当中一部分需要访问“外网”的插件),由于HassOS并没有提供底层的网络设置,除了技术流否则基本无解。

1.2  在虚拟机上安装 安装官方的HassOS镜像。
虚拟机首选VMWare,次选Hyper-V,不推荐VirtualBox。HyperV设置起来最容易,但是HyperV原生不支持蓝牙,蓝牙设备多的用户就还是用VMWare吧。
去官网下载相应的虚拟机镜像,5分钟就能跑起来,可以说毫无上手难度。

虚拟机的潜在坏处是性能比较低,网络问题更难解决(特指在Add-on Store当中一部分需要访问“外网”的插件)

不推荐。因为HAOS似乎是通过Github来拉取镜像的,国内的网络环境懂得都懂,基本上都是失败的。


(2)   The generic Home Assistant installer
不带操作系统的纯Home Assistant,理论上任何机器,只要有Python就能安装。以下统称Hass。

Home Assistant instance  running natively on a Synology NAS,


走Hass道路的好处是任何一台机器都可以装,不会独占机器,网络连接方面的问题比较好解决。缺点是操作系统不统一,Python环境不统一,搭建以及日后升级过程中的各种“个性化”错误都得自己解决;并且没有HassOS的完整功能,主要体现在缺少官方的Add-on(插件商店)。虽然绝大多数Add-on也都可以自己想办法添加,但是那也是技术流的事情了。


推荐使用Docker部署HomeAssistant

通过docker安装官方的Hass。主要解决Python环境不一致的问题。
Docker基本只在Linux环境下流行。Win环境下的Docker远远比用虚拟机更复杂。
不推荐。

第五条道路:是Ubuntu(物理机或者虚拟机都行)通过非官方的docker安装HassOS,既能拥有统一的Python环境,又能享有完整的HassOS,保留一机多用的灵活性,而且有操作系统的控制权来解决网络问题。这是我对有强烈爬墙需求的用户最推荐的方式(有人问为什么要强烈爬?你想在HA里面整合Google Assistant么?没有小度也想语音控制HA里的设备么?想,那就不会问我为什么了)。在一台干净的Ubuntu下,执行以下7条命令即可:

(1) sudo apt-get install apt-transport-https ca-certificates curl gnupg-agent software-properties-common

(2) curl -fsSL https://download.docker.com/linux/ubuntu/gpg | sudo apt-key add -
(3) sudo add-apt-repository "deb [arch=amd64] https://download.docker.com/linux/ubuntu $(lsb_release -cs) stable"

(4) sudo apt-get updatesudo apt-get install docker-ce docker-ce-cli


3.安装的方式

3.1 suggests your i7 8gb machine has more than enough.
3.2 Both a VM or just Docker are good options.
3.3
Install home assistant core with docker


目前只有 hassos 能比较容易运行起来 matter。
其实可以考虑用物理机跑hassos,也可以用虚拟机跑 hassos,网络配置成桥接,就到同一网段了


0
2 年 前
#36 引用
HA 的安装方式有4种

Running Home Assistant in a Docker Container

初次接触 HA,不知道如何下手。我们还是从相关概念开始。

HA 的安装方式有很多,大家可以参考这里:installation。简单说 HA 的安装方式有4种:

1.HA Operating System,又称 HassOS,提供了一个支持多平台的最小化的 HA 操作系统,底层基于 Docker 容器引擎,通过容器化部署的 Supervisor 容器化控制 HA Core 及相关应用。由于是 OS,因此需要独立设备或者虚拟机进行安装。官方推荐
2.HA Container,基于容器技术独立安装 HA Core,如 Docker。免去了各种环境的不统一困扰。需要在支持容器化技术的系统上使用。
3.HA Supervised,前身 Hass.io,是一个基于容器化的系统,通过容器化部署的 Supervisor 容器化控制 HA Core 及相关应用。
4.HA 提供了 手动安装 脚本。较于 HA Operating System 最大的区别就是可以安装在已有的操作系统上,其它都一样。
4.HA Core,手动安装在 Python 虚拟环境中,纯手动,可能需要一定的折腾能力。

官方建议使用专用干净系统来运行 HA。即用一台独立的硬件来装 HassOS,如果不知道怎么选择,可以使用 Raspberry Pi 和 HassOS。

如果有现有系统且支持 Docker,用 HA Container ,如 NAS。

https://deepzz.com/post/homeassistant-introduce.html


通过 Docker 方案安装的 HomeAssistant 是没有 Supervisor 的


2.硬件

Different device

you can use totally different device like Odroid, Intel NUC or even x86 or x86-64 desktop PC with Intel or AMD CPUs. As long as the device is having Debian or Debian based Linux distribution installed.
homeassistant可以安装在windows、linux等系统上,在笔记本、台式机、群辉、树莓
https://github.com/home-assistant/operating-system/blob/dev/Documentation/boards/README.md


低功耗和性能。开源智能家居因为需要长期在线,低功耗且一直开机的设备为关键。目前来看主要是NAS和更加复杂一些的树莓派;从性能设备上来说,主要区分为X86和ARM设备。


旧手机,机顶盒,路由器都可以成为homeassistant的服务器

Nas 、软路由、树莓、PC,Homeassistant 可以安装在任何机器上。

作为智能家居的网关,稳定是关键。首推使用树莓派安装。


舍得投入的话,建议还是买x86机器装debian,跑docker
0
2 年 前
#42 引用

linux下安装Home assistant core

1.安装方式说明:
       (1) 基于已有的操作系统Ubuntu 18.04 on vultr VPS
       (2) 安装python3.6
       (3) 属于不带操作系统的纯Home Assistant安装方式

2.具体安装Homeassistant时,又可以细分成2种方案
       2.1 linux下安装python3.6再安装Homeassistant
       2.2 linux下安装python3.6再以python虚拟环境安装Homeassistant

3. 安装教程
      3.1 对应 2.1 linux下安装python3.6再安装Homeassistant
How to Install Home Assistant on Ubuntu 18.04(vultr VPS) Step by Step
https://www.msly.cn/how-to-install-home-assistant-on-ubuntu-1804vultr-vps-step-by-step

How to install full Home Assistant Core on Debian 11 operating system(Native) Step by Step
https://www.msly.cn/how-to-install-full-home-assistant-core-on-debian-11-operating-systemnative-step-by-step

https://www.matterxiaomi.com/how-to-install-home-assistant-on-ubuntu-1804vultr-vps-step-by-step
对应 2.1 linux下安装python3.6再安装Homeassistant
      3.2
      https://community.home-assistant.io/t/installing-home-assistant-core-on-debian-11-with-file-sharing-over-the-network/345702

优点

performance increase

there will be probably be some performance increase running in a venv, because you don’t have Docker.

Useful links

How To Install Home Assistant On Ubuntu
https://siytek.com/how-to-install-home-assistant-on-ubuntu


比较容易成功的方式

Linux系统下,安装docker,docker中安装Home Assistant

0
2 年 前
#43 引用
Windows 10

Way 1:  Python + Home Assistant

Note:官方不再支持此种安装方式

How to Install Home Assistant Operating System on Windows 10(without Virtual Machine) Step by Step
https://www.matterxiaomi.com/install-home-assistant-on-windows-10-without-virtual-machine-step-by-step


Install Python 3.9
Install Home Assistant


Python网址为:www.python.org

Note:
docker是运行在linux上的容器技术。

win10安装docker 步骤:

第一步 启用win10自带的虚拟化技Hyper-V,
第二步是安装docker,
第三步是自定义docker 虚拟机 数据存放路径。


win10运行docker
原理:启动docker,docker 会通过Hyper-V生成一个linux虚拟机 DockerDesktopVM ,然后在 DockerDesktopVM 上运行。

docker镜像和容器数据存放:docker 的镜像文件、容器数据 都是存放在 DockerDesktopVM 的虚拟硬盘里面,也因此,这个虚拟硬盘会占用较大的空间,所以最好是自定义docker 虚拟机 数据存放路径()。

Supported Operating Systems and versions

way 2:Windows; only using WSL
https://github.com/home-assistant/architecture/blob/master/adr/0016-home-assistant-core.md#supported-operating-systems-and-versions


way 3.Windows系统下,安装虚拟机软件,虚拟机中安装,Home Assistant OS


比较容易成功的方式

1:Windows系统下,安装虚拟机软件,虚拟机中安装,Home Assistant OS
0
2 年 前
#49 引用
Install  Home Assistan supervised on Debian 11  PC

1.Install all components from the Home Assistant on a regular operating system。

Install Debian OS,
install docker,
install Home Assistan supervised.

This installation method provides the full Home Assistant experience on a regular operating system. This means, all components from the Home Assistant method are used, except for the Home Assistant Operating System.

https://github.com/home-assistant/supervised-installer

1.2  Installing Home Assistant Supervised on Debian 11
In this guide, you will be using Debian 11 as the operating system.
This type of installation is what is called “headless” .

https://community.home-assistant.io/t/installing-home-assistant-supervised-on-debian-11/200253

2.Install  Home Assistant Core on Debian 11  PC
if you don’t want to have Docker on you machine, the only choice you have is:
Install a Debian 11 OS
Install Python 3.10 on Debian 11
Install  Home Assistant Core

3.Install and run home assistant as a virtual machine
Here is my info

Home Assistant Supervisor

Host Operating System  Home Assistant OS 5.13
Update Channel  stable
Supervisor Version  supervisor-2021.05.4
Docker Version  19.03.15
Disk Total  93.8 GB
Disk Used  7.7 GB
Healthy  true
Supported  true
Board  ova
Supervisor API  ok
Version API  ok
Installed Add-ons  Terminal & SSH (9.1.3), Log Viewer (0.11.0), Samba share (9.5.0), Z-Wave JS (0.1.24), File editor (5.3.1), AppDaemon 4 (0.6.1), Visual Studio Code (3.4.1), Check Home Assistant configuration (3.7.1)


5. Install the Generic x86-64 image on PC

I got mine working now on a Beelink T4 mini. I installed the Generic x86-64 image and here is how i got it working.

Download and flash Ubuntu image on a flash drive or SD card. Any ubuntu will do. I used 20.04

Copy the downloaded haos_generic-x86-64-6.6.img.xz image into another flash drive or SD card

Boot with the ubuntu flash drive but select try ubuntu without installing

When ubuntu is booted, Insert the second flash drive

Open the flash drive and right-click on the HAOS image, open with disk image writer


select the T4 mini disk (or NUC or your laptop) as the destination and restore


When completed, shutdown ubuntu, remove the 2 flash drives and restart
0
2 年 前
#54 引用
Installing Home Assistant  on  Raspberry Pi

Raspberry Pi 3b+

Type of Installation:树莓派定制镜像ISO
https://mp.weixin.qq.com/s/q-qtHlaoh43LbUkWSuQnxg


Your Raspberry Pi needs an operating system to work.
Many operating systems are available for Raspberry Pi.
    Here are some other operating systems you can use with your Raspberry Pi:https://www.raspberrypi.com/software/operating-systems/#third-party-software

Raspberry Pi OS, official supported operating system.
This is it. Raspberry Pi OS (previously called Raspbian) is our official supported operating system.

https://www.raspberrypi.com/software/


在树莓派安装 Home Assistant,有 2 种方法供选择:

1. 以其他操作系统(首推莓派官方系统 Raspbian )为根系统,再通过指令安装;

2. 直接安装集成了 Home Assistant 的 HassOS 操作系统。


  下载homeassistant官方出品的树莓派定制镜像(官方已经将homeassistant预装在操作系统中)。

方案:

1.手动安装:直接在树莓派的操作系统Raspbian上通过手动的方式安装Home Assistant;
2.镜像安装:直接安装Hass.io固件;


说明:
如果你期望除了使用Home Assistant外,还需要在树莓派上跑一些程序的话,你可以选择方案1一一人工安装;

如果你的树莓派只用来使用Home Assistant,方案2一一镜像安装。Hass.io应该是个不错的选择。

在方案选择上,我需要使用ReSpeaker 4-Mics Pi HAT,不确定Hass.io的内核能否支持驱动,故选择了第一种方案。

1.1 另外在安装Home Assistant之前,发现好多人用docker安装,很方便,但是这里我没有使用这种方法,因为从别的地方发现一些可能潜在的问题:

在查找在线音乐插件的资料时注意到了这个:


同时,我之前也有过docker的使用经历,综合考虑没有使用docker来安装Home assistant


Installing Home Assistant core  on  Raspberry Pi 3b+

https://www.msly.cn/boards/topic/57/installing-home-assistant-core-on-raspberry-pi-3b

https://www.home-assistant.io/installation/raspberrypi

0
2 年 前
#66 引用
Installing Home Assistant Core on Debian 11 on pc intel cpu 64bit


Part 1:Install Debian OS on PC
https://www.msly.cn/how-to-install-debian-11-on-pc-step-by-step

Part 2:
https://www.linuxtechi.com/things-to-do-after-installing-debian-11/

Part 3:How to Install Python 3.10(with python virtual environment) on Debian 11 Step by Step?
https://www.msly.cn/how-to-install-python-310with-python-virtual-environment-on-debian-11-step-by-step

https://www.msly.cn/how-to-install-full-home-assistant-core-on-debian-11-operating-systemwith-python-virtual-environment-step-by-step

Home Assistant配置文件
root@hass:~# hass -v
2022-02-17 18:20:01 INFO (MainThread) [homeassistant.bootstrap] Config directory: /root/.homeassistant
0
1 年 前
#5903 引用
1
0
1 年 前
#9181 引用
Buying a device to run Home Assistant

https://www.home-assistant.io/blog/2022/04/16/device-to-run-home-assistant/


6th Gen Intel Nuc (Celeron)


N2480   300元
https://item.taobao.com/item.htm?id=680360799322&pvid=6646abf8-b70b-4184-bae5-0826753afff8&scm=1007.10157.81291.100200300000000&spm=a1z02.1.2016030118.d2016038.myQU4h

J900  350元

https://item.taobao.com/item.htm?abbucket=17&id=724621024763&ns=1&spm=a21n57.1.0.0.686d523cfF2cK0
0